--

Wednesday, March 31, 2010

Free Shipping Promotion -Handmade By Bette

I have a free shipping promotion going on right now in my Handmade By Bette Etsy shop.    Free USA shipping on any feedsack pillow or bag.   

I make these pillows using printable feedsack images from http://www.ewenmeprintables.com/

Monday, March 29, 2010

Monday Marketplace ---Painted Panache

Today I am featuring another one of the talented members of the Old Farmhouse Gathering Etsy group. Grab a drink and get comfy and read about today's featured artist and then check out the shops of some other members along the sides of my blog.

Todays' Featured Artist is Joann Wheeler of Painted Panache
1. What is the name of your Etsy shop and why did you choose that name?
Painted Panache by Joann Y Wheeler. I choose that name because that's the name I have had my business under since I began painting porcelain in 1986. Panache is defined as distinctive and stylish elegance.The word seemed to fit especially with my handpainted porcelain.
2. How long have you been on Etsy?
Since February 2007
3. What type of items do you offer?

My shop features handpainted porcelain (china painting), decorative painting on wood and glass, and miniature art (ACEO's) in various mediums.

4. How long have you been crafting?

For at least 30 years.

5. Who or What inspires you?
Nature. I love to paint flowers and animals. God inspires me. I enjoy doing religious paints as well. And i'm one of those people who cannot paint unless inspired by something.
6. What is your favorite item in your shop and why?

I can't say that I have one thing that is my absolute favorite. Every time I get one, it seems like someone buys it! However, I do tend to favor my handpainted porcelain because I believe it's one of those things that you can pass down for generations to come.
7. Other places where you can be found (Ebay, webstore, blog)

PLACES TO FIND ME.....
Blog: http://www.jywheeler.blogspot.com

Ebay: http://members.ebay.com/ws/eBayISAPI.dll?ViewUserPage&userid=heylucy1

Bonanzle: http://bonanzle.com/eclecticspirit

Artfire: http://www.artfire.com/users/ArtByJYWheeler


Saturday, March 27, 2010

Neck/Back Wheat Bag Tutorial

  Here is the wheat bag for your back/neck that I promised you.   It has been a busy week so I am a little late with it but finally here it is.   Enjoy!

                                      Neck/Back Wheat Bag Tutorial


I designed this wheat bag to fit over my shoulders and back to ease my back pain from sitting over my sewing machine or spending long periods of time sitting at my computer. I have even used it while sewing and not only does the heat feel good but the weight of the bag makes me sit straighter. My friends who have fibromyalgia find this soothing for their back/neck pain, too.

**This warning bears repeating because occasionally you will hear of someone starting a fire in their microwave or burning themselves with a too hot bag.

Never heat this bag for more than 3 minutes. Microwaves vary so start with 2 minutes and add up to another minute if it doesn’t seem warm enough. Also, let it cool completely before reheating. This is not intended for use by children.


SUPPLIES:

¾ yard of cotton muslin for the bag

7/8 yard of cotton flannel fabric for the cover

18” of velcro

6 cups of cleaned wheat (I found mine at the feed store)

DIRECTIONS:

Print out the patterns and tape them together. Add extra inches where indicated on the pattern.

The inner red lines are for the wheat bag and the black lines are for the cover.

Cut two bag pieces on the fold out of muslin.

Press a ¼ inch hem on the bottom of the muslin pieces. With the hem on the outside, pin the two sides together and stitch all around leaving the bottom hemmed edge open. Turn right side out and press.

Now you need to press in the seam allowances for the bag. Fold the bag at each point where you see the red lines and press a seam line in to follow when you stitch the individual pockets of the bag.


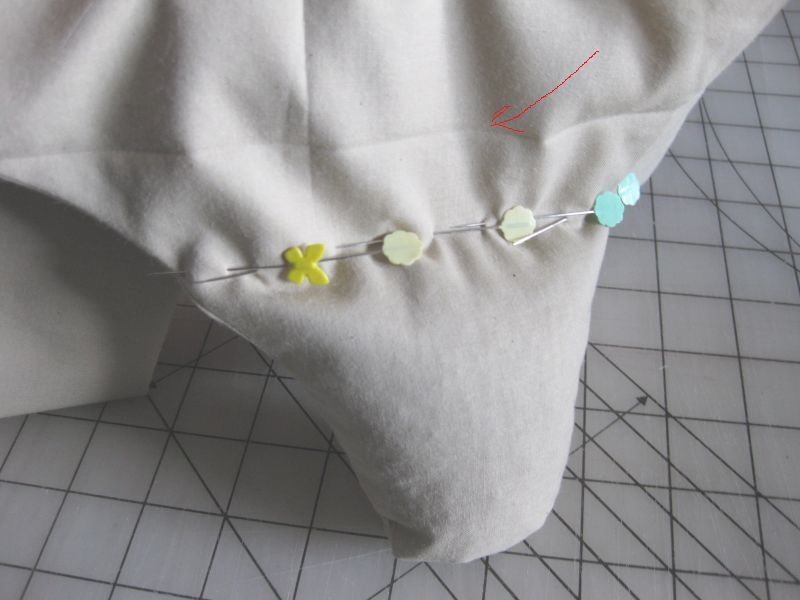
Fill the shoulder flap with 2/3 c. of wheat. To keep the wheat from moving around while you sew the seam, pin right next to the wheat using a lot of pins so no stray wheat moves into your sewing path. Now sew that section closed along the pressed seam line. The red arrow points to the pressed seam line to follow.

( If you sew over any wheat kernels it will break your needle so sew slowly and check for stray wheat kernels as you sew.)

Repeat for the other shoulder flap.


Next you will sew the three seam lines running up and down on the bag. You will now have four sections in the bag.


Working with two of them at a time, add 2/3 c. to each section. Pin against the wheat as you fill each section. Then you will stitch across the pressed seam line.


Repeat for the other two sections. You now have one row finished.


Continue to fill the bag two sections at a time with 2/3 c. of wheat, pin and stitch across the pressed seam line.

On the last row you will be stitching the opening across the bottom of the bag closed.


Here is the finished bag.


BAG COVER:

Cut two cover pieces out of flannel on the fold. The back will be cut 2 inches longer than the front cover.


Fold over the bottom of each piece of fabric ¼ inch and then again ¼ inch to form a hem.

Stitch across the hem.


Lay the two pieces right sides together and pin around the top section to hold it together. The longer section will be on the bottom.

Fold the top section back about an inch so the right side is facing up. Pin one section of Velcro evenly across.

The back section is folded up so the wrong side is showing. Pin the other section of Velcro evenly across here.

Stitch the Velcro to the cover.


One piece of Velcro is now stitched to the outside of the cover and the other to the inside.

Fold the back piece up and then press the other side down so the Velcro meets. Pin the rest of the cover together and stitch along the sides and around the shoulder flaps. Open the Velcro bottom and turn right side out and press. Put the wheat bag inside the cover and you are done.


I heat this size bag for 2 ½ minutes in my microwave. Microwave times can vary depending on the microwave size so you may need a bit longer or shorter time.


Pattern Pieces
Click on the pictures and print them out.
©Bette Shaw   All rights reserved.

Monday, March 22, 2010

Monday's Marketplace ---Pioneer Loft

Today I am featuring another one of the talented members of the Old Farmhouse Gathering Etsy group. Grab a drink and get comfy and read about today's featured artist and then check out the shops of some other members along the sides of my blog.

Todays' Featured Artist is Denise of Pioneer Loft

1. What is the name of your Etsy shop and why did you choose that name?

Pioneer Loft is my name. It's a name I came up with for my business years ago. We have a small farm and there is a plaque on the house that says "PIONEER HOUSE", since the house was built so long ago (1860). We have a barn, and I always had a liking of lofts in barns, so I put the two words together from that. (Plus I hope to have a store in our barn & loft one day!)


2. How long have you been on Etsy?

Since August of 2009

3. What type of items do you offer?

Mostly primitives, but some cottage items, too. I sew, stencil, and tole paint and my hubby makes small furniture with a prim finish. I love to make dolls the most, but do a lot of things from old quilts like tablerunners, candle mats, pillows, check book covers, ornaments & more.

4. How long have you been crafting?

I started sewing in 7th grade (that would be 1968) and made most all my clothes for years. When I stayed home after having my daughter in 1982, I did stitching crafts, but I didn't sell anything I made until later in the 80's. I also took quilting classes in 1987, but have only made quilts for personal use.

5. Who or What inspires you?

God. (Also seeing other great handmade prims!)

6. What is your favorite item in your shop and why?


Dolls & bears. I just love to create charater & life out of fabric.

7. Other places where you can be found (Ebay, webstore, blog)
PLACES TO FIND ME.....


Etsy ---http://www.etsy.com/shop/PioneerLoft
Website --- http://www.pioneerloft.com
Blog --- http://www.pioneerloft.blogspot.com

I sell on ebay infrequently, but my user name is thepioneerloft there.


Monday, March 15, 2010

Wheat Bag Tutorial

Wheat Bag Tutorial


I have been making wheat bags this past week and thought I would share how to make them with you.
I have found the wheat to work better than other fillings I have tried. They work wonderfully for aches and pains, pulled muscles, and would you believe they even help to break up chest congestion. Freeze a small one to relieve headaches and bumps and bruises.


First I want to issue a warning because occasionally you will hear of someone starting a fire in their microwave or burning themselves with a too hot bag.
Never heat these bags for more than 30 Seconds to 2 1/2 minutes, depending on their size. The smaller the bag the less time it needs to heat. Also, let them cool completely before reheating. If you are going to use this on a child, test it on yourself first. You would be surprised on how hot a bag can get in just 30 seconds.

SUPPLIES: for an 8 x 10 inch bag:
You will need two 8 ½ x 11 inch pieces of cotton muslin for the bag
Two pieces of cotton flannel fabric, one 9 x 12 inches and one 9 x 16 inches, for the cover
4 cups of cleaned wheat (I found mine at the feed store)
This is what the wheat should look like:


DIRECTIONS:
Press a ¼ inch seam allowance over on one short side of the muslin for a hem on both pieces of fabric. This will be the top of the bag.


With the right sides together, pressed edge on the outside, sew down one side around the bottom and up the other side.


Turn the bag right side out. Fold the bag in half lengthwise and press the folded edge to create a stitching line to follow.
Stitch on the line, creating two long pockets in the bag.


Now fold the bag the other way in half and press the folded edge to create a stitching line across the bag to follow.

Insert one cup of wheat into each side of the bag. To keep the wheat from moving around while you sew the seam, pin right next to the wheat using a lot of pins so no stray wheat moves into your sewing path.


Sew across the pressed seam line. ( If you sew over any wheat kernels it will break your needle so sew slowly and check for stray wheat kernels as you sew.)
Add a cup of wheat into each of the last two pockets. Pin along the edge of the wheat to keep it contained. Sew along the top edge to close the bag.


Here is the finished bag.


BAG COVER:


Fold over one short side of each piece of fabric ¼ inch and then again ¼ inch to form a hem.
Stitch across the hem.


Lay out the longer piece right side up. Fold the hemmed side over 2 inches to the right side.
Lay the shorter piece on top with wrong side up.


Pin sides and bottom and then stitch together along the sides and across the bottom in a ¼ inch seam.


Turn right side out and put the wheat bag inside and fold the flap over. I heat this size bag for 1 ½ minutes in my microwave. Microwave times can vary depending on the microwave size so you may need a bit longer or shorter time.

Next week I will have the tutorial for a back/shoulder Wheat Bag I devised for myself because long hours of sitting over a sewing machine leaves me with back pain.
Here is a sneak peak of the finished bag.


©Bette Shaw All rights reserved.

Monday Marketplace - Keepsake Korner

Today I am featuring another one of the talented members of the Old Farmhouse Gathering Etsy group. Grab a drink and get comfy and read about today's featured artist and then check out the shops of some other members along the sides of my blog.

Todays' Featured Artist is Susan Green of Keepsake Korners

1. What is the name of your Etsy shop and why did you choose that name?

KeepSakeKorner. As to how the name came about.....actually...nothing
special. Wanted a name that reflected items you would want to keep. So I
played around with some names. Now my sub-line "Creations from Stitches of
Thread" came about from playing around with names that represented for the
most part, my creativity in fibers.

2. How long have you been on Etsy?

I started May 2008.

3. What type of items do you offer?

Many purposeful/needful items. Most are
sewing. I do alot of other art work, but haven't displayed much on Etsy.

4. How long have you been crafting?

Just about all my life. My grandmother
that raised me taught me to sew. She was a lovely seamstress. Did a lot of
sewing during the depression to bring in extra money.

5. Who or What inspires you?

Words from novels, poems etc. can inspire me. Then
there is God's Creation! Awesome!

6. What is your favorite item in your shop and why?


Oh I guess my Yo-Yo Flower
picture that is framed. Right now they are alot of fun. I get bored easily,
(perhaps I have ADD) will thus try new things and go all out for a while
until the boredom bug bites. ! :)


7. Other places where you can be found (Ebay, webstore, blog)
PLACES TO FIND ME.....


http://www.keepsakekorner.etsy.com
http://wwwKeepsakeKorner.blogspot.com


Monday, March 8, 2010

Monday's Marketplace - Rabbit Hollow Prims

Today I am featuring another one of the talented members of the Old Farmhouse Gathering Etsy group. Grab a drink and get comfy and read about today's featured artist and then check out the shops of some other members along the sides of my blog.

Todays' Featured Artist is Susan O'Connor of Rabbit Hollow Prims

1. What is the name of your Etsy shop and why did you choose that name?

Rabbit Hollow Prims because my mom had the name for her shop when it was open and wanted to carry on the name.

2. How long have you been on Etsy?

About 2 years

3. What type of items do you offer?

primitive dolls. vintage patterns, fabrics and turkey calls

4. How long have you been crafting?

17 years

5. Who or What inspires you?

All the other doll artists out there.

6. What is your favorite item in your shop and why?


I couldn't pick just one but I love Halloween the most.

7. Other places where you can be found (Ebay, webstore, blog)
PLACES TO FIND ME.....


http://www.rabbithollowprims.blogspot.com
http://www.spookyspells.blogspot.com
http://shop.ebay.com/merchant/rabbithollowprims_W0QQ_nkwZQQ_armrsZ1QQ_fromZQQ_ipgZ
http://www.etsy.com/shop.php?user_id=5125705
http://www.lemonpoppyseeds.com/shoppes/psrabbithollowprims/
http://wsoapp-rabbithollowprims.blogspot.com/
http://www.countrycraftshowonline.com/craftbooth489/
http://www.ksgpshoppe.com/RabbitHollowPrims.html
http://rabbithollowprims-soatp.blogspot.com/


Tuesday, March 2, 2010

Spring Blog Giveaway Winner


And the winner is, drum roll please, Becky of Pennsylvania.

Congratulations, Becky!! Your prize will be on it's way to you in tomorrows mail.

You can visit Becky at her blog.
http://bechindblueeyes.blogspot.com/


A big thank you to everyone who entered my giveaway. Watch for my next giveway coming soon.

Winner was picked by Random.org.

Monday, March 1, 2010

Online Yardsale Starts Today


The Ezshoppes Online Yardsale has started. It will run from Mar. 1 to 14th. Items are uploaded throughout the show so do come back again throughout the run and check.
I have loaded my booth with lots of goodies so come check it out.
To see all the booths, click here.


Monday's Marketplace - Firecrackerkid Primitives

Today I am featuring another one of the talented members of the Old Farmhouse Gathering Etsy group. Grab a drink and get comfy and read about today's featured artist and then check out the shops of some other members along the sides of my blog.

Todays' Featured Artist is Carol Anderson of Firecrakerkid Primitives

1. What is the name of your Etsy shop and why did you choose that name?
Firecrackerkid Primitives. I chose this name, because I was born on the 4th of July, and my family always called me "the firecrackerkid". My father said when I was born I came out with a bang, jokingly of course. Plus it's Independence Day, and I really love my country, and my freedom so it all fits together nicely.

2. How long have you been on Etsy?

One year and four months

3. What type of items do you offer?

One-of-a-kind Woodcrafts and reproduction woodcrafts of different Early American dough bowl racks and furniture.

4. How long have you been crafting?

Twenty years.

5. Who or What inspires you?

The love of all things Primitive. Plus, the economy is what inspired my husband and myself to make our own Primitives. My husband is who inspires me, because of his hard work ethics, and the fact that he can do just about anything or any challenge put before him. He's a hard working man. A Jack-of-all-trades so to speak. He was a carpenter since he was a teenager, and even built our home along with several other homes locally. Pretty inspiring and impressive to me.

6. What is your favorite item in your shop and why?


That would be our one-of-a-kind items. We like to come up with unique primitive woodcrafts that are appealing to others, and yet at the same time are functional in the home.

7. Other places where you can be found (Ebay, webstore, blog)
PLACES TO FIND ME.....


http://www.firecrackerkid.etsy.com
http://firecrackerkid.blogspot.com/
http://myworld.ebay.com/carola_firecrackerbaby
http://www.facebook.com/home.php#/profile.php?id=1817572815&v=wall&ref=name


blogger templates | Make Money Online