


--

Showing posts with label tutorial. Show all posts

Saturday, March 27, 2010

Neck/Back Wheat Bag Tutorial

  Here is the wheat bag for your back/neck that I promised you.   It has been a busy week so I am a little late with it but finally here it is.   Enjoy!

                                      Neck/Back Wheat Bag Tutorial


I designed this wheat bag to fit over my shoulders and back to ease my back pain from sitting over my sewing machine or spending long periods of time sitting at my computer. I have even used it while sewing and not only does the heat feel good but the weight of the bag makes me sit straighter. My friends who have fibromyalgia find this soothing for their back/neck pain, too.

**This warning bears repeating because occasionally you will hear of someone starting a fire in their microwave or burning themselves with a too hot bag.

Never heat this bag for more than 3 minutes. Microwaves vary so start with 2 minutes and add up to another minute if it doesn’t seem warm enough. Also, let it cool completely before reheating. This is not intended for use by children.


SUPPLIES:

¾ yard of cotton muslin for the bag

7/8 yard of cotton flannel fabric for the cover

18” of velcro

6 cups of cleaned wheat (I found mine at the feed store)

DIRECTIONS:

Print out the patterns and tape them together. Add extra inches where indicated on the pattern.

The inner red lines are for the wheat bag and the black lines are for the cover.

Cut two bag pieces on the fold out of muslin.

Press a ¼ inch hem on the bottom of the muslin pieces. With the hem on the outside, pin the two sides together and stitch all around leaving the bottom hemmed edge open. Turn right side out and press.

Now you need to press in the seam allowances for the bag. Fold the bag at each point where you see the red lines and press a seam line in to follow when you stitch the individual pockets of the bag.


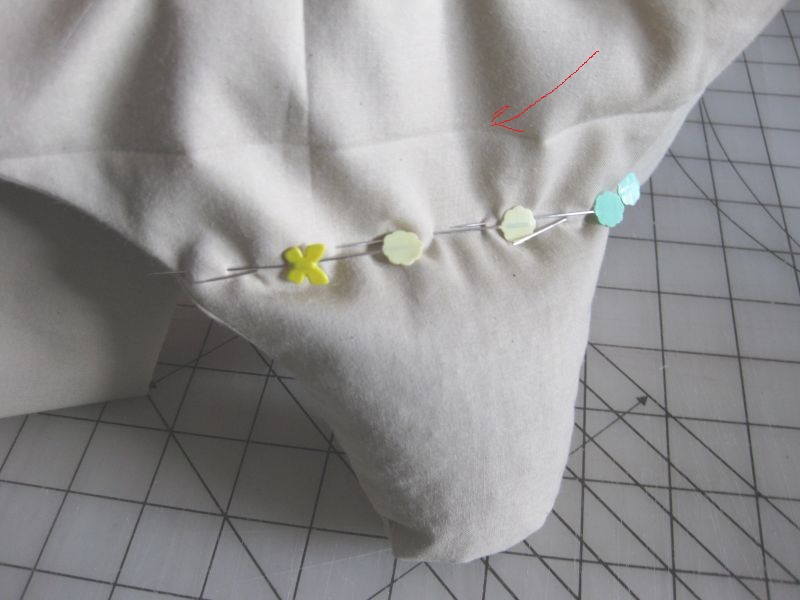
Fill the shoulder flap with 2/3 c. of wheat. To keep the wheat from moving around while you sew the seam, pin right next to the wheat using a lot of pins so no stray wheat moves into your sewing path. Now sew that section closed along the pressed seam line. The red arrow points to the pressed seam line to follow.

( If you sew over any wheat kernels it will break your needle so sew slowly and check for stray wheat kernels as you sew.)

Repeat for the other shoulder flap.


Next you will sew the three seam lines running up and down on the bag. You will now have four sections in the bag.


Working with two of them at a time, add 2/3 c. to each section. Pin against the wheat as you fill each section. Then you will stitch across the pressed seam line.


Repeat for the other two sections. You now have one row finished.


Continue to fill the bag two sections at a time with 2/3 c. of wheat, pin and stitch across the pressed seam line.

On the last row you will be stitching the opening across the bottom of the bag closed.


Here is the finished bag.


BAG COVER:

Cut two cover pieces out of flannel on the fold. The back will be cut 2 inches longer than the front cover.


Fold over the bottom of each piece of fabric ¼ inch and then again ¼ inch to form a hem.

Stitch across the hem.


Lay the two pieces right sides together and pin around the top section to hold it together. The longer section will be on the bottom.

Fold the top section back about an inch so the right side is facing up. Pin one section of Velcro evenly across.

The back section is folded up so the wrong side is showing. Pin the other section of Velcro evenly across here.

Stitch the Velcro to the cover.


One piece of Velcro is now stitched to the outside of the cover and the other to the inside.

Fold the back piece up and then press the other side down so the Velcro meets. Pin the rest of the cover together and stitch along the sides and around the shoulder flaps. Open the Velcro bottom and turn right side out and press. Put the wheat bag inside the cover and you are done.


I heat this size bag for 2 ½ minutes in my microwave. Microwave times can vary depending on the microwave size so you may need a bit longer or shorter time.


Pattern Pieces
Click on the pictures and print them out.
©Bette Shaw   All rights reserved.

Monday, March 15, 2010

Wheat Bag Tutorial

Wheat Bag Tutorial


I have been making wheat bags this past week and thought I would share how to make them with you.
I have found the wheat to work better than other fillings I have tried. They work wonderfully for aches and pains, pulled muscles, and would you believe they even help to break up chest congestion. Freeze a small one to relieve headaches and bumps and bruises.


First I want to issue a warning because occasionally you will hear of someone starting a fire in their microwave or burning themselves with a too hot bag.
Never heat these bags for more than 30 Seconds to 2 1/2 minutes, depending on their size. The smaller the bag the less time it needs to heat. Also, let them cool completely before reheating. If you are going to use this on a child, test it on yourself first. You would be surprised on how hot a bag can get in just 30 seconds.

SUPPLIES: for an 8 x 10 inch bag:
You will need two 8 ½ x 11 inch pieces of cotton muslin for the bag
Two pieces of cotton flannel fabric, one 9 x 12 inches and one 9 x 16 inches, for the cover
4 cups of cleaned wheat (I found mine at the feed store)
This is what the wheat should look like:


DIRECTIONS:
Press a ¼ inch seam allowance over on one short side of the muslin for a hem on both pieces of fabric. This will be the top of the bag.


With the right sides together, pressed edge on the outside, sew down one side around the bottom and up the other side.


Turn the bag right side out. Fold the bag in half lengthwise and press the folded edge to create a stitching line to follow.
Stitch on the line, creating two long pockets in the bag.


Now fold the bag the other way in half and press the folded edge to create a stitching line across the bag to follow.

Insert one cup of wheat into each side of the bag. To keep the wheat from moving around while you sew the seam, pin right next to the wheat using a lot of pins so no stray wheat moves into your sewing path.


Sew across the pressed seam line. ( If you sew over any wheat kernels it will break your needle so sew slowly and check for stray wheat kernels as you sew.)
Add a cup of wheat into each of the last two pockets. Pin along the edge of the wheat to keep it contained. Sew along the top edge to close the bag.


Here is the finished bag.


BAG COVER:


Fold over one short side of each piece of fabric ¼ inch and then again ¼ inch to form a hem.
Stitch across the hem.


Lay out the longer piece right side up. Fold the hemmed side over 2 inches to the right side.
Lay the shorter piece on top with wrong side up.


Pin sides and bottom and then stitch together along the sides and across the bottom in a ¼ inch seam.


Turn right side out and put the wheat bag inside and fold the flap over. I heat this size bag for 1 ½ minutes in my microwave. Microwave times can vary depending on the microwave size so you may need a bit longer or shorter time.

Next week I will have the tutorial for a back/shoulder Wheat Bag I devised for myself because long hours of sitting over a sewing machine leaves me with back pain.
Here is a sneak peak of the finished bag.


©Bette Shaw All rights reserved.

Thursday, October 22, 2009

Pantry Fabric Basket Tutorial

Pantry Fabric Baskets Tutorial


You will love the way your pantry looks with this unique way to organize and store your foodstuff. As and example of what they will hold, 2 five pound bags of flour or 3 bags of rice will fit in the basket.

Feedsack images, courtesy of Deena Davis, are available at http://www.ewenmeprintables.com


Supplies To Make 3 Baskets

Finished size: approx. 9 inches x 6 inches x 6 inches

Main Fabric----------30 inches x 45 inches wide
Lining Fabric---------30 inches x 45 inches wide
Heavy Duty Sew-In Interfacing----60 inches x 20 inches wide
3--8 ½ x 11 pieces of freezer paper
6--8 ½ x 11 pieces of tea-dye muslin
Matching thread


For each basket:

Cut 3 piece A from main fabric
Cut 2 Piece B from main fabric
Cut 3 piece A from lining fabric
Cut 2 Piece B from lining fabric
Cut 3 piece A from heavy duty interfacing
Cut 2 Piece B from heavy duty interfacing

These five pieces will be cut from fabric, lining and interfacing.


Printing the image.
You can buy fabric sheets that are ready made for printing on or print the reversed images that are included on to iron-on transfer paper which you then iron on to muslin.
You can also iron your muslin to the same size freezer paper and print directly on to the fabric. I recommend an Epson printer and Epson durabrite ink which is permanent if you are going to do this as most other inks will wash out.

This is juat a sampling of images available.


Print the feedsack image onto fabric:
Cut the printed image out, leaving ¼” seam allowance all around it. With right sides together, lay the image on a same size piece of muslin. Stitch around, leaving a 2” opening for turning. Turn right side out and press. Place the image on the front of the main fabric, centering it. Stitch it to the fabric all around the outside edge.

You can also print the reversed images on to fabric transfer paper and then iron the image on to the front panel.


Directions:

MAIN BASKET:
Pin the interfacing to the wrong side of the main fabric pieces. Stitch the interfacing to the fabric around all the edges, ¼ inch from the edge.
Do this for all 5 outer pieces. You will be using these stitching lines to sew your basket together so make sure they are accurate seams.


With right sides together, pin a side piece to the bottom piece starting ¼ inch in from the edge and ending ¼ inch from the end. Stitch this seam in a ¼ inch seam allowance, backstitching at the start and finish of the seam, leaving ¼ inch on each end of the seam unsewn. The red line is the stitching line. It is important to leave the ¼ inch unsewn on each side in order to have sharp points on your finished seams.


Sew the other side to the bottom the same way.

Sew the front side and back side pieces to the bottom the same way.

You should now have four sides sewn to to the bottom of the basket.


With right sides together, pin a front panel to the side panel. Stitch from the top edge down the seam until you are ¼ inch from the bottom and backstitch. Red line is stitching line. Before you stitch this seam, make sure the bottom panel fabric is pulled down out of the way of your stitching.
Red arrow shows how this should look as you sew.


Sew the other three sides the same way.

Your outer basket is now finished. Turn right side out.


LINING:


The lining is made the same way as the main basket only you do not use interfacing.
Basket is shown inside out as you will insert the main basket inside it.


ASSEMBLING THE BASKET:

Insert the main basket into the lining, right sides will be together.
Pin together all around the top, leaving a 5 inch opening on one side.
Red line indicates opening.


Stitch around the top edge in a ¼ inch seam.


Pull the main basket through the opening. Push the lining down into the basket pushing the corners out.
Pin the basket and lining together evenly across the top. Fold the open edges in ¼ inch and pin. This opening will be sewn closed as you stitch around the top.
Topstitch along the outside edge and your basket is finished.


© 2009 Bette Shaw - All rights reserved

Click on these patterns and print them out.

Monday, October 12, 2009

Fall Round Fabric Basket Tutorial

This is a good table size basket, you can fill it with apples or other fruit. Make one especially for Halloween candy. It would make a nice basket for dinner rolls on the holidays, too. The finished basket is 9 inches diameter and 9 inches tall.

Feedsack images, courtesy of Deena Davis, are available at http://www.ewenmeprintables.com

(Be sure and join my blog followers to be notified of my next basket tutorial. You won't want to miss the great basket idea I have in store for you to make.)


Supplies To Make one 9 inch Basket

Main Fabric----------1/2 yard
Lining Fabric---------1/2 yard
Heavy Duty Sew-In Interfacing----28 inches x 22 inches
1--8 ½ x 11 pieces of freezer paper
2--8 ½ x 11 pieces of tea-dye muslin
Matching thread

Circle patterns are at the end of this post. Click on them and print them out.
Either cut two larger circles and tape them together or cut the circles on the fold.

For each basket:

Cut 1 --9 inch circle from main fabric
Cut 1 --27 ½ inch x 9 inch side panel from main fabric
Cut 1 --9 inch circle from lining fabric
Cut 1 --27 ½ inch x 9 inch side panel from lining fabric
Cut 1 --9 inch circle from heavy duty interfacing
Cut 1 --27 ½ inch x 9 inch side panel from heavy duty interfacing


Printing the image.
You can buy fabric sheets that are ready made for printing on or print the reversed images that are included on to iron-on transfer paper which you then iron on to the basket.
You can also iron your muslin to the same size freezer paper and print directly on to the fabric. I recommend an Epson printer and Epson durabrite ink which is permanent if you are going to do this as most other inks will wash out.

Print the feedsack image onto fabric:
Cut the printed image out, leaving ¼” seam allowance all around it. With right sides together, lay the image on a same size piece of muslin. Stitch around, leaving a 2” opening for turning. Turn right side out and press.


DIRECTIONS:

Layer the main fabric and interfacing circles together with the fabric facing right side up. Pin together and then zig zag them together around the outside edge.


With the right sides together, pin the main side panel to the interfacing. Stitch together all around the outside edge.

Pin the image in the middle of the main fabric side 3/4 inch up from the bottom. Stitch it to the main fabric.


Now fold the panel over with right sides together so that the side seams meet and the seam is aligned together. Pin and then stitch in a ¼ inch seam.


With the right sides together, pin the circle to the side panel at the bottom.


With the circle against the feeddogs and using a ¼ inch seam allowance, stitch around the seam.


Turn the basket right side out.

Make the lining basket the same as the main basket but eliminating the interfacing. Leave the lining wrong side out.


Set the main basket inside the lining basket. The right sides will be together.
Pin main basket to lining


Stitch in a ¼ inch seam, leaving a 5 inch opening for turning.

Turn the basket right side out through the opening.

Pin the basket and lining together evenly across the top. Fold the open edges in ¼ inch and pin. This opening will be sewn closed as you stitch around the top.
Topstitch along the outside edge and your basket is finished. Turn the top down to form a cuff if desired.

Here is a smaller basket I made for Thanksgiving.


SIX INCH BASKET:
Supplies To Make 1 Basket

Main Fabric----------1/3 yard
Lining Fabric---------1/3 yard
Heavy Duty Sew-In Interfacing----22 inches x 22 inches
1--8 ½ x 11 pieces of freezer paper
2--8 ½ x 11 pieces of tea-dye muslin
Matching thread


For each basket:

Cut 1 –6 ¾ inch circle from main fabric
Cut 1 –20 3/4 inch x 7 inch side panel from main fabric
Cut 1 --6 ¾ inch circle from lining fabric
Cut 1 --20 3/4 inch x 7 inch side panel from lining fabric
Cut 1 --6 ¾ inch circle from heavy duty interfacing
Cut 1 --20 3/4 inch x 7 inch side panel from heavy duty interfacing


Assemble the same as the bigger basket.

© 2009 Bette Shaw - All rights reserved


blogger templates | Make Money Online