


HOLIDAY SPECIAL
I have decided to do my own stimulus package for my fellow crafters and continue the buy one get one of equal or lesser value free pattern sale.
You can take advantage of this Holiday Deal on my website; http://www.bettestomorrowstreasures.com
or my Etsy shop
http://www.tomorrowstreasures.etsy.com
Thursday, December 3, 2009
Friday, November 27, 2009
Black Friday to Cyber Monday Pattern Sale

First time ever, buy one pattern and get one free of equal or lesser value on my website. http://www.bettestomorrowstreasures.com
Etsy Shop Black Friday to Cyber Monday Sale
Etsy shop Black Friday through Cyber Monday offers:
http://www.HandmadeByBette.etsy.com
Free shipping on all pot holders and feedsack pillows.
http://www.tomorrowstreasures.etsy.com
Buy one pattern and get one of equal or lessor value free.
http://www.HandmadeByBette.etsy.com
Free shipping on all pot holders and feedsack pillows.
http://www.tomorrowstreasures.etsy.com
Buy one pattern and get one of equal or lessor value free.
Saturday, November 21, 2009
Weekend Special In My Etsy Shop

I am giving free shipping on all feedsack pillows this weekend in my Etsy shop, http://www.handmadebybette.etsy.com
They make a great present for primitive lovers.
Tuesday, November 10, 2009

I am having a pre-Black Friday sale on my website starting today and ending November 26, 2009. Get 20% off on everything on my website. It is a great time to stock up on next year's crafting patterns or find a gift for the special person in your life.
Click on the link below to take you there.
Bette's Tomorrows Treasures Website
Thursday, October 22, 2009
Pantry Fabric Basket Tutorial
Pantry Fabric Baskets Tutorial

You will love the way your pantry looks with this unique way to organize and store your foodstuff. As and example of what they will hold, 2 five pound bags of flour or 3 bags of rice will fit in the basket.
Feedsack images, courtesy of Deena Davis, are available at http://www.ewenmeprintables.com

Supplies To Make 3 Baskets
Finished size: approx. 9 inches x 6 inches x 6 inches
Main Fabric----------30 inches x 45 inches wide
Lining Fabric---------30 inches x 45 inches wide
Heavy Duty Sew-In Interfacing----60 inches x 20 inches wide
3--8 ½ x 11 pieces of freezer paper
6--8 ½ x 11 pieces of tea-dye muslin
Matching thread
For each basket:
Cut 3 piece A from main fabric
Cut 2 Piece B from main fabric
Cut 3 piece A from lining fabric
Cut 2 Piece B from lining fabric
Cut 3 piece A from heavy duty interfacing
Cut 2 Piece B from heavy duty interfacing
These five pieces will be cut from fabric, lining and interfacing.

Printing the image.
You can buy fabric sheets that are ready made for printing on or print the reversed images that are included on to iron-on transfer paper which you then iron on to muslin.
You can also iron your muslin to the same size freezer paper and print directly on to the fabric. I recommend an Epson printer and Epson durabrite ink which is permanent if you are going to do this as most other inks will wash out.
This is juat a sampling of images available.

Print the feedsack image onto fabric:
Cut the printed image out, leaving ¼” seam allowance all around it. With right sides together, lay the image on a same size piece of muslin. Stitch around, leaving a 2” opening for turning. Turn right side out and press. Place the image on the front of the main fabric, centering it. Stitch it to the fabric all around the outside edge.
You can also print the reversed images on to fabric transfer paper and then iron the image on to the front panel.

Directions:
MAIN BASKET:
Pin the interfacing to the wrong side of the main fabric pieces. Stitch the interfacing to the fabric around all the edges, ¼ inch from the edge.
Do this for all 5 outer pieces. You will be using these stitching lines to sew your basket together so make sure they are accurate seams.

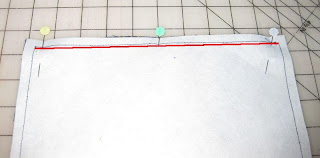
With right sides together, pin a side piece to the bottom piece starting ¼ inch in from the edge and ending ¼ inch from the end. Stitch this seam in a ¼ inch seam allowance, backstitching at the start and finish of the seam, leaving ¼ inch on each end of the seam unsewn. The red line is the stitching line. It is important to leave the ¼ inch unsewn on each side in order to have sharp points on your finished seams.
Sew the other side to the bottom the same way.
Sew the front side and back side pieces to the bottom the same way.
You should now have four sides sewn to to the bottom of the basket.

With right sides together, pin a front panel to the side panel. Stitch from the top edge down the seam until you are ¼ inch from the bottom and backstitch. Red line is stitching line. Before you stitch this seam, make sure the bottom panel fabric is pulled down out of the way of your stitching.
Red arrow shows how this should look as you sew.

Sew the other three sides the same way.
Your outer basket is now finished. Turn right side out.

LINING:
The lining is made the same way as the main basket only you do not use interfacing.
Basket is shown inside out as you will insert the main basket inside it.

ASSEMBLING THE BASKET:
Insert the main basket into the lining, right sides will be together.
Pin together all around the top, leaving a 5 inch opening on one side.
Red line indicates opening.

Stitch around the top edge in a ¼ inch seam.
Pull the main basket through the opening. Push the lining down into the basket pushing the corners out.
Pin the basket and lining together evenly across the top. Fold the open edges in ¼ inch and pin. This opening will be sewn closed as you stitch around the top.
Topstitch along the outside edge and your basket is finished.

© 2009 Bette Shaw - All rights reserved
Click on these patterns and print them out.


You will love the way your pantry looks with this unique way to organize and store your foodstuff. As and example of what they will hold, 2 five pound bags of flour or 3 bags of rice will fit in the basket.
Feedsack images, courtesy of Deena Davis, are available at http://www.ewenmeprintables.com

Supplies To Make 3 Baskets
Finished size: approx. 9 inches x 6 inches x 6 inches
Main Fabric----------30 inches x 45 inches wide
Lining Fabric---------30 inches x 45 inches wide
Heavy Duty Sew-In Interfacing----60 inches x 20 inches wide
3--8 ½ x 11 pieces of freezer paper
6--8 ½ x 11 pieces of tea-dye muslin
Matching thread
For each basket:
Cut 3 piece A from main fabric
Cut 2 Piece B from main fabric
Cut 3 piece A from lining fabric
Cut 2 Piece B from lining fabric
Cut 3 piece A from heavy duty interfacing
Cut 2 Piece B from heavy duty interfacing
These five pieces will be cut from fabric, lining and interfacing.

Printing the image.
You can buy fabric sheets that are ready made for printing on or print the reversed images that are included on to iron-on transfer paper which you then iron on to muslin.
You can also iron your muslin to the same size freezer paper and print directly on to the fabric. I recommend an Epson printer and Epson durabrite ink which is permanent if you are going to do this as most other inks will wash out.
This is juat a sampling of images available.

Print the feedsack image onto fabric:
Cut the printed image out, leaving ¼” seam allowance all around it. With right sides together, lay the image on a same size piece of muslin. Stitch around, leaving a 2” opening for turning. Turn right side out and press. Place the image on the front of the main fabric, centering it. Stitch it to the fabric all around the outside edge.
You can also print the reversed images on to fabric transfer paper and then iron the image on to the front panel.

Directions:
MAIN BASKET:
Pin the interfacing to the wrong side of the main fabric pieces. Stitch the interfacing to the fabric around all the edges, ¼ inch from the edge.
Do this for all 5 outer pieces. You will be using these stitching lines to sew your basket together so make sure they are accurate seams.

With right sides together, pin a side piece to the bottom piece starting ¼ inch in from the edge and ending ¼ inch from the end. Stitch this seam in a ¼ inch seam allowance, backstitching at the start and finish of the seam, leaving ¼ inch on each end of the seam unsewn. The red line is the stitching line. It is important to leave the ¼ inch unsewn on each side in order to have sharp points on your finished seams.

Sew the other side to the bottom the same way.
Sew the front side and back side pieces to the bottom the same way.
You should now have four sides sewn to to the bottom of the basket.

With right sides together, pin a front panel to the side panel. Stitch from the top edge down the seam until you are ¼ inch from the bottom and backstitch. Red line is stitching line. Before you stitch this seam, make sure the bottom panel fabric is pulled down out of the way of your stitching.
Red arrow shows how this should look as you sew.

Sew the other three sides the same way.
Your outer basket is now finished. Turn right side out.

LINING:
The lining is made the same way as the main basket only you do not use interfacing.
Basket is shown inside out as you will insert the main basket inside it.

ASSEMBLING THE BASKET:
Insert the main basket into the lining, right sides will be together.
Pin together all around the top, leaving a 5 inch opening on one side.
Red line indicates opening.

Stitch around the top edge in a ¼ inch seam.
Pull the main basket through the opening. Push the lining down into the basket pushing the corners out.
Pin the basket and lining together evenly across the top. Fold the open edges in ¼ inch and pin. This opening will be sewn closed as you stitch around the top.
Topstitch along the outside edge and your basket is finished.

© 2009 Bette Shaw - All rights reserved
Click on these patterns and print them out.


Monday, October 19, 2009
Free Patterns Are Now Up On My Website
The free patterns on my website have been updated today. Enjoy!
Gingerella

Rag Quilted Stockings

Gingerella

Rag Quilted Stockings

Monday, October 12, 2009
Fall Round Fabric Basket Tutorial
This is a good table size basket, you can fill it with apples or other fruit. Make one especially for Halloween candy. It would make a nice basket for dinner rolls on the holidays, too. The finished basket is 9 inches diameter and 9 inches tall.
Feedsack images, courtesy of Deena Davis, are available at http://www.ewenmeprintables.com
(Be sure and join my blog followers to be notified of my next basket tutorial. You won't want to miss the great basket idea I have in store for you to make.)


Supplies To Make one 9 inch Basket
Main Fabric----------1/2 yard
Lining Fabric---------1/2 yard
Heavy Duty Sew-In Interfacing----28 inches x 22 inches
1--8 ½ x 11 pieces of freezer paper
2--8 ½ x 11 pieces of tea-dye muslin
Matching thread
Circle patterns are at the end of this post. Click on them and print them out.
Either cut two larger circles and tape them together or cut the circles on the fold.
For each basket:
Cut 1 --9 inch circle from main fabric
Cut 1 --27 ½ inch x 9 inch side panel from main fabric
Cut 1 --9 inch circle from lining fabric
Cut 1 --27 ½ inch x 9 inch side panel from lining fabric
Cut 1 --9 inch circle from heavy duty interfacing
Cut 1 --27 ½ inch x 9 inch side panel from heavy duty interfacing
Printing the image.
You can buy fabric sheets that are ready made for printing on or print the reversed images that are included on to iron-on transfer paper which you then iron on to the basket.
You can also iron your muslin to the same size freezer paper and print directly on to the fabric. I recommend an Epson printer and Epson durabrite ink which is permanent if you are going to do this as most other inks will wash out.
Print the feedsack image onto fabric:
Cut the printed image out, leaving ¼” seam allowance all around it. With right sides together, lay the image on a same size piece of muslin. Stitch around, leaving a 2” opening for turning. Turn right side out and press.
DIRECTIONS:
Layer the main fabric and interfacing circles together with the fabric facing right side up. Pin together and then zig zag them together around the outside edge.

With the right sides together, pin the main side panel to the interfacing. Stitch together all around the outside edge.
Pin the image in the middle of the main fabric side 3/4 inch up from the bottom. Stitch it to the main fabric.

Now fold the panel over with right sides together so that the side seams meet and the seam is aligned together. Pin and then stitch in a ¼ inch seam.

With the right sides together, pin the circle to the side panel at the bottom.

With the circle against the feeddogs and using a ¼ inch seam allowance, stitch around the seam.

Turn the basket right side out.
Make the lining basket the same as the main basket but eliminating the interfacing. Leave the lining wrong side out.

Set the main basket inside the lining basket. The right sides will be together.
Pin main basket to lining

Stitch in a ¼ inch seam, leaving a 5 inch opening for turning.
Turn the basket right side out through the opening.
Pin the basket and lining together evenly across the top. Fold the open edges in ¼ inch and pin. This opening will be sewn closed as you stitch around the top.
Topstitch along the outside edge and your basket is finished. Turn the top down to form a cuff if desired.
Here is a smaller basket I made for Thanksgiving.

SIX INCH BASKET:
Supplies To Make 1 Basket
Main Fabric----------1/3 yard
Lining Fabric---------1/3 yard
Heavy Duty Sew-In Interfacing----22 inches x 22 inches
1--8 ½ x 11 pieces of freezer paper
2--8 ½ x 11 pieces of tea-dye muslin
Matching thread
For each basket:
Cut 1 –6 ¾ inch circle from main fabric
Cut 1 –20 3/4 inch x 7 inch side panel from main fabric
Cut 1 --6 ¾ inch circle from lining fabric
Cut 1 --20 3/4 inch x 7 inch side panel from lining fabric
Cut 1 --6 ¾ inch circle from heavy duty interfacing
Cut 1 --20 3/4 inch x 7 inch side panel from heavy duty interfacing
Assemble the same as the bigger basket.
© 2009 Bette Shaw - All rights reserved


Tuesday, October 6, 2009
New Feedsack Pillows Added
Deena of Http://www.ewenmeprintables.com has created some new feedsack images. Perfect for the holiday season and you can use them for so many different things.
I love making pillows from them. These are available on my website.


I love making pillows from them. These are available on my website.


Sunday, September 13, 2009
New Pattern Released - Embellished Rag Quilted Recycled Jeans Purse Epattern


This is a large, rag quilted, eco-friendly shoulder bag purse e-pattern. What a neat way to upcycle your old jeans.
You embellish the blocks from your stash of buttons, yoyos, embroideries, fabric printed pictures, stitch sayings, the ideas are endless to make this purse uniquely your own.
Purse has two dividers sewn in, has a button closure and holds everything you could possibly need for the day.
As usual lots of photos so you can see the steps.
Finished size is 12 in. H x 15 1/2 in. W x 4 1/2 in. D.
Wednesday, August 26, 2009
Update on Recycled Jeans Veggie Bags
I thought I would post an update on how the recycle jeans veggie bags are working out.
The most important tip I have found is to feed them with Miracle Grow fertilizer every week or two. What a difference in the plants since I started doing that.
Their potting soil is real nice, too, as it holds the water better than the cheaper kind but the cheaper stuff will work as long as you fertilize the soil.
I am so excited about my first cucumber. This was taken a few days ago. It is even bigger now. They surely do grow fast!

Another thing I did was to put pots under the bags so I am not wasting the water that drips from the bottom of the bags. Next year I will put bush type vegetables in them.

Here is a picture of Deena's tomato bag. Http://www.ewenmeprintables.com

Now I am trying to figure out how I can use these bags for fall vegetables. Please leave a comment if you have any ideas on what type winter vegetable would grow in them.
Saturday, July 25, 2009
New Pattern Released Retro Annie Bag Doll
I really love the retro fabrics available now and had to do a bag doll pattern so I could use them. Hope you like it.


Friday, July 24, 2009
Free Patterns Are Now Up On My Website
The free patterns on my website have been changed today.
They are ready for instant download. Enjoy!
Prudence Pumpkin Doll

Sunflower Make-do

They are ready for instant download. Enjoy!
Prudence Pumpkin Doll

Sunflower Make-do

Saturday, June 13, 2009
Recycled Jeans Hanging Veggie Bag Tutorial

I am always looking for a new way to recycle old jeans. Here is my tutorial for making hanging veggie bags from the leg and waistband from jeans.
Finished bag size = 20 inches long
Supply List
Pair of old jeans
Thread
Shoe Lace
4” round plastic lid
Potting soil
Plant
Cut off one lower leg from the jeans, 20 ½ inches long up from the bottom hem. The bottom hem will be the top of the bag and the cut part will be the bottom.

Turn the leg inside out. Taper the side seams by measuring in 1 ½ inches at the bottom and tapering up. Red line is the sewing line.

Make a ½ inch buttonhole 1 ¼ inch up from the bottom.

Fold the hem over ¾ inch. Zig zag stitch the hem, making sure your seam allowances both fold over to the same side so it will be easier to thread the shoelace through the casing.

Attach a large safety pin to one end of the shoe lace and pull it through the casing.

Strap:
Cut off 28 inches of the waistband for the strap, carefully cutting off the belt loops.
Optionally: Cut a 5 inch wide x 28 inch long piece of denim for a strap. Fold over lengthwise and zig zag the sides closed. Stitch to the pant leg in the same way as the waistband.

Stitch both sides of the strap to the top of the bag evenly. Zig zag along the bottom the of strap and then stitch around the stap and crossways.

Cut a slit in the plastic lid and a quarter size hole in the middle

Place the lid around the plant stem.

Very carefully gather the leaves together with your hand and place the plant inside the bag from the top and out the bottom.
The plastic lid will help to hold the soil in when you water.

Gather the bottom up as tightly as you can and tie off.

The easiest way to fill the bag is to hang it over a door knob. Fill the bag a little at a time with potting soil making sure you pack the soil tightly so there are no air holes in the soil.

You can plant flowers in the top of the bag if desired.
I used a couple of long nails to hang my plants from the house eaves. You can use large hooks if desired. They can be hung from a tree limb, a tall fence post. Wherever they will get maximum sun exposure.
I used regular potting soil in the first ones I made and I add plant food every two weeks to the top of the bag.
The last one I made I used Miracle Grow potting soil that has plant food in it so I will see which one works better.
You will have to water every day if it is very hot out.
This is a picture of my first tomato in the first bag I planted. I started the tomatoes from larger plants and it took about three weeks for the first tomato to appear. Notice how the plants grow up toward the sun.

My cucumber plants were very small and they are just now starting to flower. The plants are still very small so we will see how they do.


© 2009 Bette Shaw--------All Rights Reserved
Subscribe to:
Posts (Atom)


