Here is the wheat bag for your back/neck that I promised you. It has been a busy week so I am a little late with it but finally here it is. Enjoy!
Neck/Back Wheat Bag Tutorial
I designed this wheat bag to fit over my shoulders and back to ease my back pain from sitting over my sewing machine or spending long periods of time sitting at my computer. I have even used it while sewing and not only does the heat feel good but the weight of the bag makes me sit straighter. My friends who have fibromyalgia find this soothing for their back/neck pain, too.
**This warning bears repeating because occasionally you will hear of someone starting a fire in their microwave or burning themselves with a too hot bag.
Never heat this bag for more than 3 minutes. Microwaves vary so start with 2 minutes and add up to another minute if it doesn’t seem warm enough. Also, let it cool completely before reheating. This is not intended for use by children.
SUPPLIES:
¾ yard of cotton muslin for the bag
7/8 yard of cotton flannel fabric for the cover
18” of velcro
6 cups of cleaned wheat (I found mine at the feed store)
DIRECTIONS:
Print out the patterns and tape them together. Add extra inches where indicated on the pattern.
The inner red lines are for the wheat bag and the black lines are for the cover.
Cut two bag pieces on the fold out of muslin.
Press a ¼ inch hem on the bottom of the muslin pieces. With the hem on the outside, pin the two sides together and stitch all around leaving the bottom hemmed edge open. Turn right side out and press.
Now you need to press in the seam allowances for the bag. Fold the bag at each point where you see the red lines and press a seam line in to follow when you stitch the individual pockets of the bag.
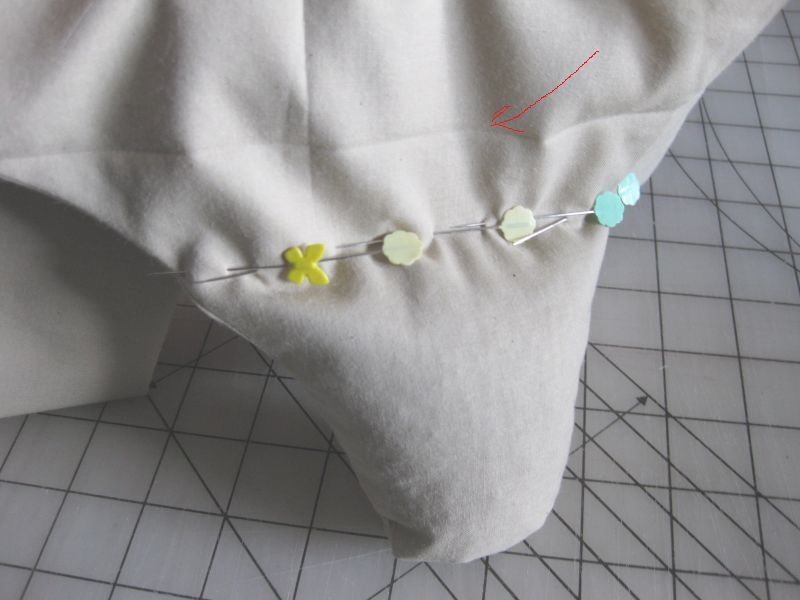
Fill the shoulder flap with 2/3 c. of wheat. To keep the wheat from moving around while you sew the seam, pin right next to the wheat using a lot of pins so no stray wheat moves into your sewing path. Now sew that section closed along the pressed seam line. The red arrow points to the pressed seam line to follow.
( If you sew over any wheat kernels it will break your needle so sew slowly and check for stray wheat kernels as you sew.)
Repeat for the other shoulder flap.
Next you will sew the three seam lines running up and down on the bag. You will now have four sections in the bag.
Working with two of them at a time, add 2/3 c. to each section. Pin against the wheat as you fill each section. Then you will stitch across the pressed seam line.
Repeat for the other two sections. You now have one row finished.
Continue to fill the bag two sections at a time with 2/3 c. of wheat, pin and stitch across the pressed seam line.
On the last row you will be stitching the opening across the bottom of the bag closed.
Here is the finished bag.
BAG COVER:
Cut two cover pieces out of flannel on the fold. The back will be cut 2 inches longer than the front cover.
Fold over the bottom of each piece of fabric ¼ inch and then again ¼ inch to form a hem.
Stitch across the hem.
Lay the two pieces right sides together and pin around the top section to hold it together. The longer section will be on the bottom.
Fold the top section back about an inch so the right side is facing up. Pin one section of Velcro evenly across.
The back section is folded up so the wrong side is showing. Pin the other section of Velcro evenly across here.
Stitch the Velcro to the cover.
One piece of Velcro is now stitched to the outside of the cover and the other to the inside.
Fold the back piece up and then press the other side down so the Velcro meets. Pin the rest of the cover together and stitch along the sides and around the shoulder flaps. Open the Velcro bottom and turn right side out and press. Put the wheat bag inside the cover and you are done.
I heat this size bag for 2 ½ minutes in my microwave. Microwave times can vary depending on the microwave size so you may need a bit longer or shorter time.
Pattern Pieces
Click on the pictures and print them out.
©Bette Shaw All rights reserved.